Royal pigeon looks dramatic because it stacks several hard ranges into one shape. The front hip turns out, the back hip opens, the back knee bends, the upper back arches, and one arm reaches overhead. Set each part up in order, lifting your chest before you reach back, so your knees and lower back never take the strain.
Quick Facts: Royal Pigeon Pose
- Equipment needed: None (a mat helps; a strap or towel, a folded blanket and a folded towel are optional supports)
- Difficulty: Expert (as rated in the FitCraft app)
- Modality: Static stretch (a hold)
- Body region: Hips, thighs, belly, side of the back and calves (glutes, hip flexors, quadriceps, rectus abdominis, glute medius, calves and latissimus dorsi, stretched)
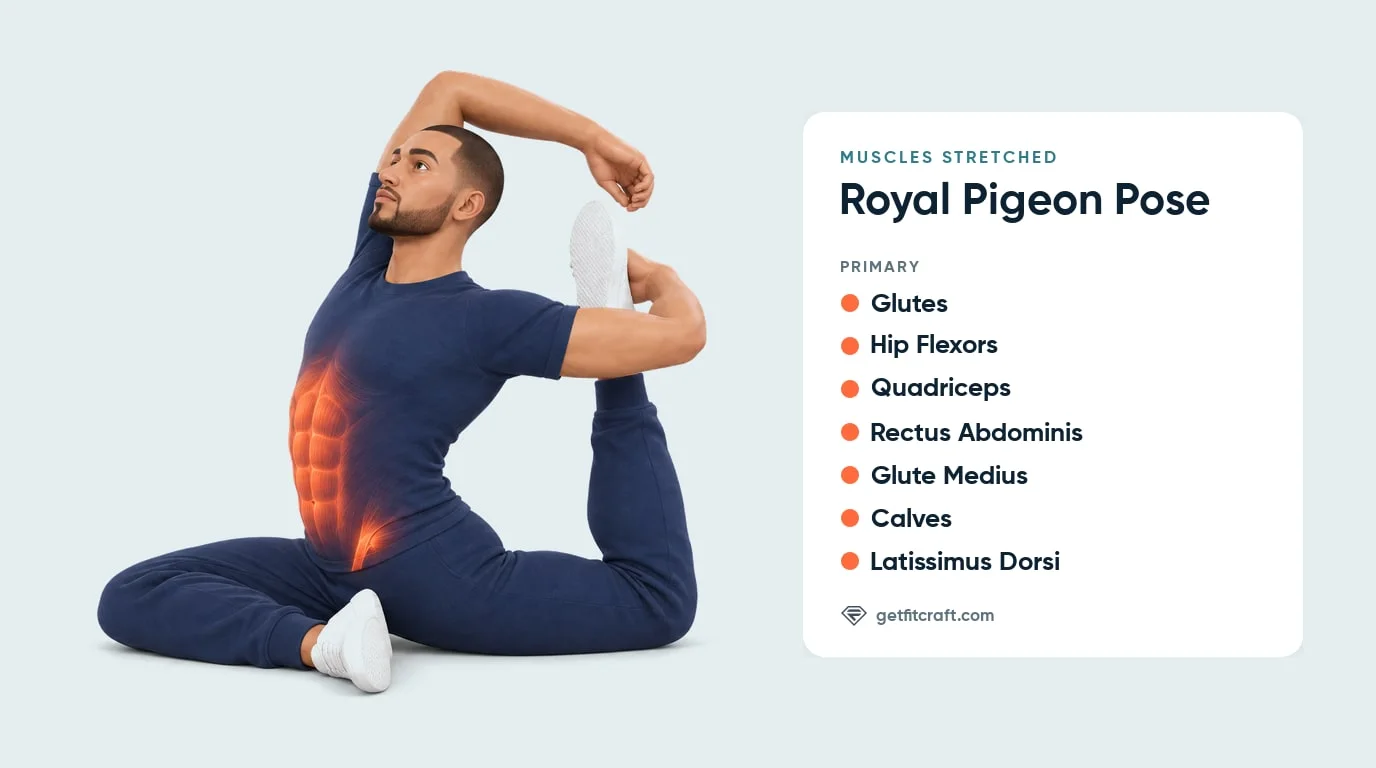
Muscles Stretched
Muscles stretched: the glutes, the hip flexors, the quadriceps, the rectus abdominis, the glute medius, the calves and the latissimus dorsi. Royal pigeon is a static hold, so these muscles lengthen and stay long rather than lifting anything. The front hip rests bent and turned out under your body, which lengthens the glutes behind it and the glute medius on its outer side. At the back, the hip opens while the knee bends and your hand holds the foot, which lengthens the hip flexors and the quadriceps at the front of the back hip and thigh.
Lifting the chest into the backbend lengthens the rectus abdominis down the front of your trunk. The arm reaching overhead lengthens the latissimus dorsi along the side of your back. Flexing the front foot, toes drawn back toward the shin, gives the calf of the front leg a light stretch.
Where you should feel it: a mild stretch in your front glute and outer hip, at the front of your back hip and thigh, down your belly, along the side of your back under your raised arm, and lightly in your front calf. You shouldn't feel it in your knees or neck. Any pain in a joint (your knees, hips and shoulders included), your lower back or your neck, or any numbness or tingling, means stop.
Pigeon pose and cobra pose make good preparation: pigeon pose uses the same base, and cobra pose is a gentler backbend that also stretches the rectus abdominis. Butterfly pose and downward dog fit into the same session.
Step-by-Step: How to Do Royal Pigeon Pose
- Warm up first. Do royal pigeon when you are already warm, for example near the end of a yoga or mobility session. Gentler stretches such as pigeon pose, cobra pose and a few rounds of cat-cow make good preparation.
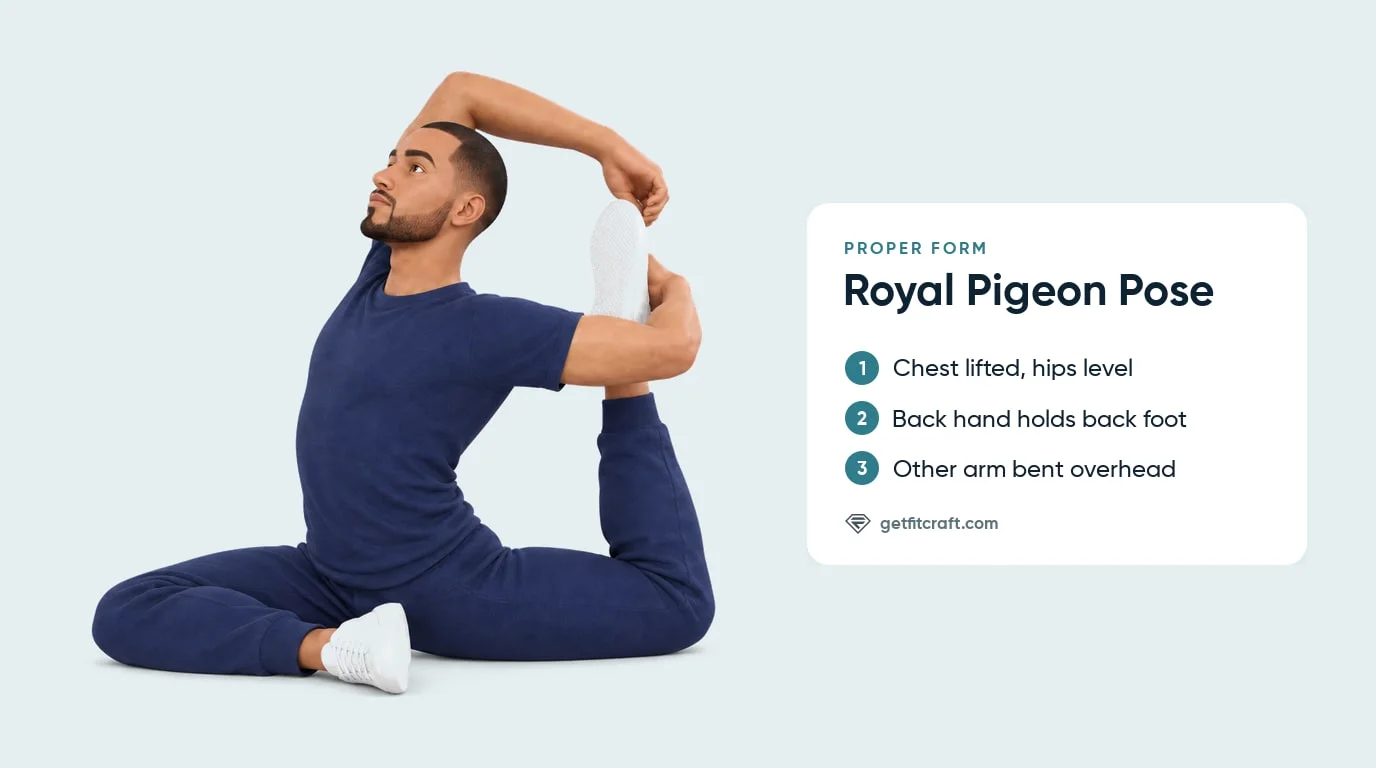
- Set up pigeon. From hands and knees, slide one knee forward and lay the outer shin and knee on the floor with the front heel near the opposite hip. Extend the other leg straight behind you with the thigh and knee resting on the floor.
- Level the hips. Keep your hips as level as you can, with both hip points facing forward. If the front hip floats, place a folded blanket under it. If the back knee presses into the floor, rest on the front of the back thigh rather than the kneecap, and put a folded towel under the knee.
- Flex the front foot and lift the chest. Draw the toes of your front foot back toward the shin. Press your fingertips into the floor, lengthen your spine, and lift your chest up and away from the front thigh. Lift the chest before you reach back.
- Bend the back knee and hold the foot. Bend the back knee so the shin points up toward the ceiling. Reach back with the same-side hand and hold the back foot without yanking it. If you can't reach it, loop a strap or towel around the foot and hold the ends.
- Reach the other arm overhead. Raise your other arm overhead with the elbow bent and reach that hand back toward the same foot, catching it with both hands if you can. Lift the chest into a gentle backbend that comes mostly from the upper back, with your belly gently engaged, eyes up and neck long. Never crank your head back.
- Hold and release with control. Hold for about 15 to 30 seconds at a time, or for the time your workout sets, breathing slowly and steadily. Let go of the foot first and return to pigeon, then give the other side the same time.
Get this exercise in a personalized workout
FitCraft, our mobile fitness app, uses its AI coach Ty to program yoga poses like this into your plan at the right volume and intensity, based on your level, goals, and equipment. Ty was designed and trained by Domenic Angelino, MPH (Brown University) and NSCA-CSCS, with research published in the Journal of Strength and Conditioning Research and Medicine & Science in Sports & Exercise.
Take the Free Assessment Free • 2 minutes • No credit cardCommon Mistakes
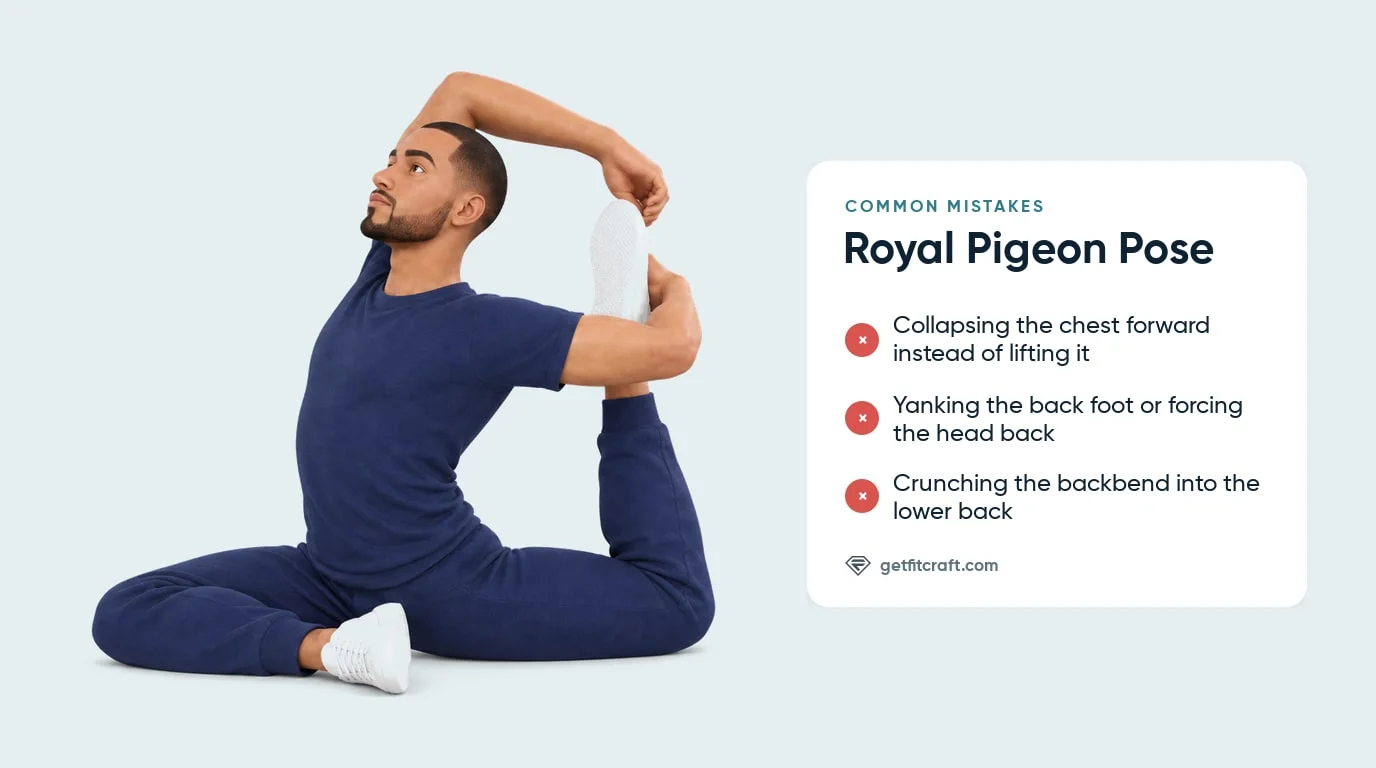
Collapsing the Chest Forward
What it looks like: The shoulders round, the chest falls toward the front thigh, and the spine loses length.
Why it's a problem: You lose the backbend, so the stretch down the front of your trunk fades and the pose turns into a forced hip shape.
The fix: Press your fingertips into the floor and lift your chest before reaching for the foot. Keep the strap version if the direct grip costs you the chest lift.
Letting the Hips Roll Open
What it looks like: The back-leg hip lifts, the pelvis rolls away from the front leg, and the weight dumps into one side.
Why it's a problem: The stretch at the front of the back hip and thigh gets weaker.
The fix: Support the front hip with a folded blanket and keep the hips as level as you can. A small tilt is common; a pelvis that dumps to one side is not.
Yanking the Back Foot or Forcing the Head Back
What it looks like: You yank the foot closer by arching the lower back or twisting the shoulder, or tip your head back hard to reach it.
Why it's a problem: The knee, lower back, shoulder and neck take the strain.
The fix: Hold the foot without pulling, or loop a strap or towel around it. Let your head move back only as far as your neck stays long. Ease off the moment your breath gets tight; any pain in a joint, your lower back or your neck means stop.
Crunching the Backbend Into the Lower Back
What it looks like: The arch comes from the lower back while the upper back stays flat and the chest stays low.
Why it's a problem: The lower back takes the strain instead of the upper back.
The fix: Lift the chest first, engage your belly gently, and arch mostly from the upper back.
Pressing the Back Kneecap Into the Floor
What it looks like: Your weight sits on the back kneecap as the back knee bends.
Why it's a problem: It puts point pressure on the kneecap.
The fix: Shift your pelvis forward so your weight moves onto the front of the back thigh, and put a folded towel under the back knee.
Holding the Breath
What it looks like: You clamp down and stop breathing as you reach for the foot.
Why it's a problem: Holding your breath makes the hold tense, and tight breathing means you have gone deeper than you need.
The fix: Breathe slowly and steadily the whole time. If your breathing gets tight, ease off the backbend a little.
Royal Pigeon Pose Variations: Regressions and Progressions
Easier Regressions
- Supported Pigeon Pose. Stay in pigeon with the back leg straight and the chest tall, hands on the floor, with a folded blanket under the front hip if it floats. This lets you practice the hip position without the back-knee bend or the backbend.
- One-Hand Back-Leg Grip. Bend the back knee and hold the foot with the same-side hand while your other hand stays on the floor beside you. Keep the chest lifted.
- Strap Royal Pigeon. Loop a strap or towel around the back foot and hold the ends. The strap lets you practice the shape of the pose without forcing contact.
Harder Version and a Related Hold
- Both Hands on the Foot. Catch the back foot with both hands, elbows pointing up, and draw it a little closer to your head while your chest stays lifted. Keep it a mild stretch.
- Mermaid Pose. A separate Expert hold in the FitCraft app that hooks the bent back foot into the elbow crease and brings the hands together behind the head. It also stretches the hip flexors and quadriceps.
Preparation Exercises
- Cobra Pose. A gentler backbend lying face down that also stretches the rectus abdominis.
- Butterfly Pose. Stretches the adductors along your inner thighs in a simple seated position.
- Warrior Pose. A standing pose that works the quadriceps, glutes, glute medius and front shoulders; it fits into the same yoga session.
When to Avoid Royal Pigeon Pose
A few conditions call for a check with your doctor or physical therapist before you do royal pigeon pose. A mild stretch in your hips, thighs, belly or sides is normal; any pain in a joint (your knees, hips and shoulders included), your lower back or your neck, or any numbness or tingling, means stop. Always consult your physician or physical therapist for personalized guidance.
- Knee pain, meniscus irritation, or recent knee surgery. See a doctor or physical therapist before you try royal pigeon, and after knee surgery get your surgeon's okay first. You shouldn't feel this pose in your knees; any knee pain means stop right away.
- Hip impingement or a pinch in the front of the hip. A pinch is pain, so stop right away, and see a doctor or physical therapist before you try the pose again.
- Lower-back pain. See a doctor or physical therapist before you try royal pigeon. Any lower back pain means stop.
- Shoulder injury or shoulder pain. See a doctor or physical therapist before you try the overhead reach. Any shoulder pain means stop.
- Pregnancy, recent surgery, uncontrolled hypertension, balance disorders, or hypermobility. Check with your doctor, midwife or surgeon before doing royal pigeon pose. Any pain in a joint, your lower back or your neck means stop.
- Numbness, tingling, dizziness, or tight breathing. Come out of the pose right away if you feel numbness, tingling, dizziness or lightheadedness. If your breathing gets tight, ease off the backbend.
Related Exercises
- Same pose family: Pigeon pose uses the same base and folds forward over the front leg instead of lifting into a backbend.
- Related Expert hold: Mermaid pose, also rated Expert in the FitCraft app, hooks the bent back foot into the elbow crease instead of holding it with the hand.
- Mobility prep: Half-kneeling triplanar stretch stretches the hip flexors from a half-kneeling lunge and turns the chest open with one arm reaching up.
- Spine and pelvis prep: Cat-cow trains controlled spinal movement before deeper backbends.
- Core strength for the same session: Deadbugs work the abdominals and the hip flexors, a strength move that pairs well with a stretching session.
How to Program Royal Pigeon Pose
The American College of Sports Medicine's guidance on flexibility exercise recommends stretching each major muscle group on at least 2 days a week, for about 60 seconds in total per stretch (Garber et al., 2011). For royal pigeon, that means holds of about 15 to 30 seconds per side, repeated, or the time your workout sets. Come out sooner if your breathing gets tight.
| Version | Hold time | Total per side | Frequency |
|---|---|---|---|
| Easier: pigeon with the back leg straight, one hand on the foot, or a strap or towel around it | About 15 to 30 seconds per hold | Repeat to about 60 seconds | At least 2 days a week |
| Expert: the full hold as the app teaches it | About 15 to 30 seconds per hold, or the time your workout sets | Repeat to about 60 seconds; come out sooner if your breathing gets tight | At least 2 days a week |
| Harder: both hands on the back foot | About 15 to 30 seconds per hold | Repeat to about 60 seconds | At least 2 days a week |
Place royal pigeon late in a yoga flow, after sun salutations, lunges, hip openers, and backbends. It can also work as a cool-down after lower-body training or as part of a standalone mobility session, but it should not be your first deep stretch of the day.
Good form matters more than the time target. End the hold when your pelvis rolls open or your breathing gets tight, and stop right away for any pain in a joint, your lower back or your neck.
The FitCraft app includes royal pigeon pose as two Expert holds, one for each side, and can include them in your plan. Its 3D demonstrations show the hold: the back knee bent with the same-side hand holding the back foot, the other arm reaching overhead toward it, and the chest lifted.
Frequently Asked Questions
What's the difference between pigeon pose and royal pigeon pose?
Pigeon pose holds the pigeon base and folds forward over the front leg. Royal pigeon keeps the pigeon base, then bends the back knee so the shin points up, holds the back foot with the same-side hand, reaches the other arm overhead toward it, and lifts the chest into a gentle backbend.
What muscles does royal pigeon pose stretch?
Royal pigeon stretches the glutes, the hip flexors, the quadriceps, the rectus abdominis, the glute medius, the calves and the latissimus dorsi. The front hip, bent and turned out under your body, lengthens the glutes behind it and the glute medius on its outer side. Opening the back hip while that knee bends and your hand holds the foot lengthens the hip flexors and the quadriceps at the front of the back hip and thigh. Lifting the chest into the backbend lengthens the rectus abdominis down the front of your trunk, and the arm reaching overhead lengthens the latissimus dorsi along the side of your back. Flexing the front foot, toes drawn back toward the shin, gives the calf of the front leg a light stretch.
Is royal pigeon pose safe for beginners?
Royal pigeon is rated Expert in the FitCraft app, so beginners should start with the easier versions: stay in pigeon with the back leg straight and the chest tall, hold the back foot with one hand while the other hand stays on the floor, or loop a strap or towel around the back foot. Never yank the foot toward your head.
Can I do royal pigeon pose with knee pain?
No. You shouldn't feel royal pigeon in your knees, so any knee pain means stop right away, and see a doctor or physical therapist before you try it again.
How long does it take to build up to royal pigeon pose?
There is no set timeline. Build up with the easier versions, one hand on the foot or a strap around it, and add the next piece only while the stretch stays mild and nothing hurts. Progress comes from regular practice, never from pulling harder on the foot in one session.