The supported row exists because a bent-over row has one built-in limiter: your lower back has to hold the hinge for the whole set. If your lower back tires first, the set ends before your back muscles have done their work. Any lower back pain means stop.
Bracing one hand and knee on a bench or box changes the job. Your torso stays steady, your working arm has room to pull, and your back and arm muscles do the work instead of your lower back. That makes the supported row useful for home dumbbell training and for learning the row when strict unsupported rows feel too demanding.
Quick Facts: Supported Row
- Equipment needed: One dumbbell and a bench, box, or sturdy elevated support
- Difficulty: Intermediate (a higher support makes it easier)
- Modality: Strength
- Body region: Upper body (back, shoulders and arms)
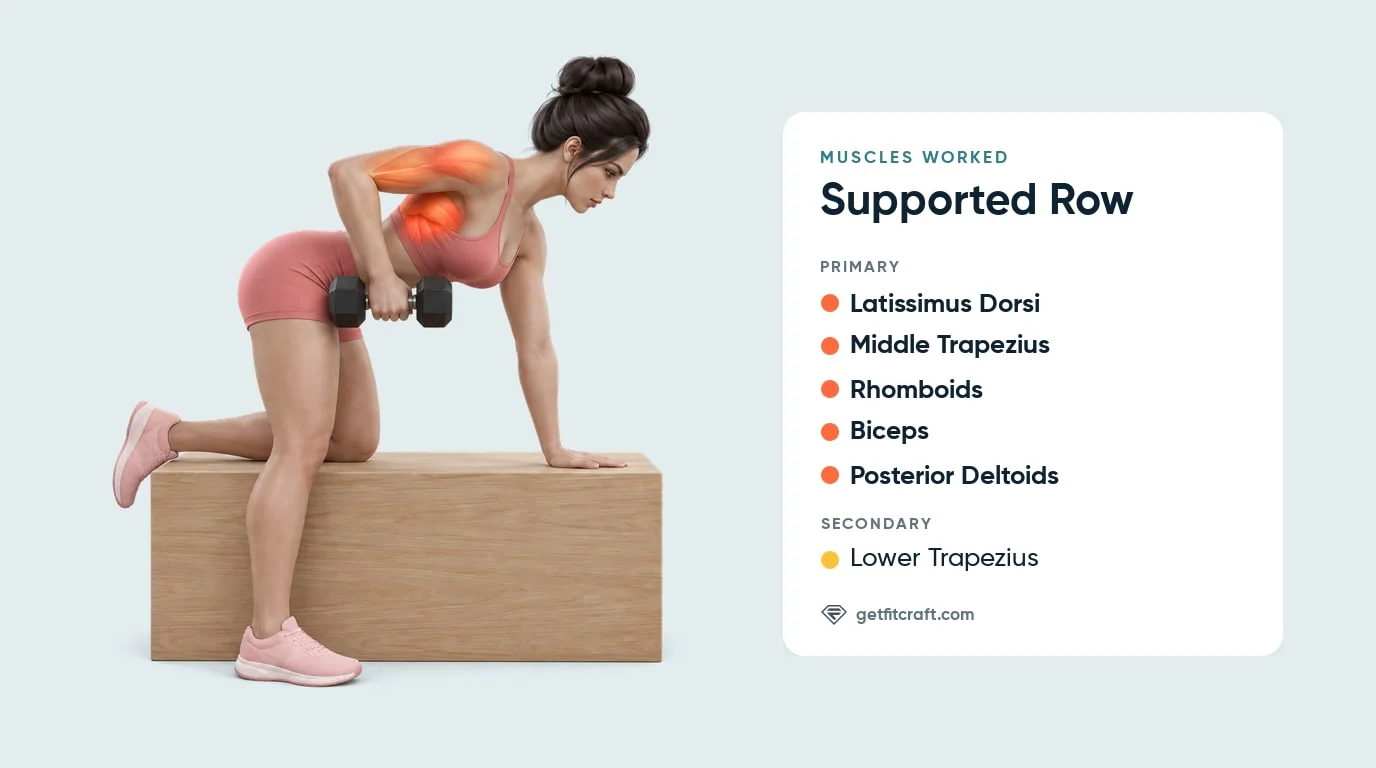
Muscles Worked
Primary movers: the latissimus dorsi, middle trapezius, rhomboids, biceps, and posterior deltoids on the rowing side. The lats pull your upper arm back toward your hip. The middle trapezius and rhomboids squeeze your shoulder blade toward your spine at the top. The biceps bend your elbow, and the posterior deltoid draws your arm back. These muscles shorten during the row and lengthen under tension as you lower the dumbbell.
Secondary movers: the lower trapezius holds your shoulder blade down so it doesn't shrug toward your ear as you pull.
Why the support matters: the braced hand and knee reduce the need to hold a long unsupported hip hinge. That shifts the limiting factor away from lower-back endurance and toward the back and arm muscles on the rowing side. Keep the support stable, keep your chest square, and the row becomes a cleaner back-building drill.
Step-by-Step: How to Do a Supported Row
Step 1: Set Up the Support
Place one hand and the same-side knee on a flat bench or a sturdy box about knee height, the hand directly under your shoulder and the knee under your hip. Your other foot stays flat on the floor with that knee softly bent. Hold one dumbbell in your free hand and let it hang under your shoulder with your palm facing in.
Tip: Use a support that cannot move or tip, keep your support hand right under your shoulder, and hold the dumbbell with your wrist straight.
Step 2: Create a Flat Back
Hinge from your hips until your back is flat and your torso is about level with the floor or angled up to about 45 degrees. A higher support makes you more upright and the row easier. Brace your core, keep your ribs down, and keep your gaze on the floor so your neck stays neutral.
Tip: Keep your back flat and your chest square to the floor for the whole set.
Step 3: Pull to Your Ribs
Row the dumbbell toward your lower ribs and hip by driving your elbow up and back, close to your side, until it passes your torso.
Tip: Lift only as high as you can without your torso turning.
Step 4: Squeeze at the Top
Pause briefly when your elbow passes your torso. Squeeze the shoulder blade toward your spine without rolling your chest open or shrugging toward your ear.
Tip: Keep your shoulder down, away from your ear, while you squeeze.
Step 5: Lower Under Control
Lower the dumbbell over about one to two seconds until your arm is straight again, without letting your shoulder drop toward the floor or your chest turn. Keep the lowering controlled so your back keeps working on the way down too. Exhale on the pull and inhale on the way down. Finish your reps, then switch sides.
Tip: Never let the weight drop, and never hold your breath.
Get this exercise in a personalized workout
FitCraft, our mobile fitness app, uses its AI coach Ty to program pulling exercises like this into your plan at the right volume and intensity, based on your level, goals, and equipment. Ty was designed and trained by Domenic Angelino, MPH (Brown University) and NSCA-CSCS, with research published in the Journal of Strength and Conditioning Research and Medicine & Science in Sports & Exercise.
Take the Free Assessment Free • 2 minutes • No credit card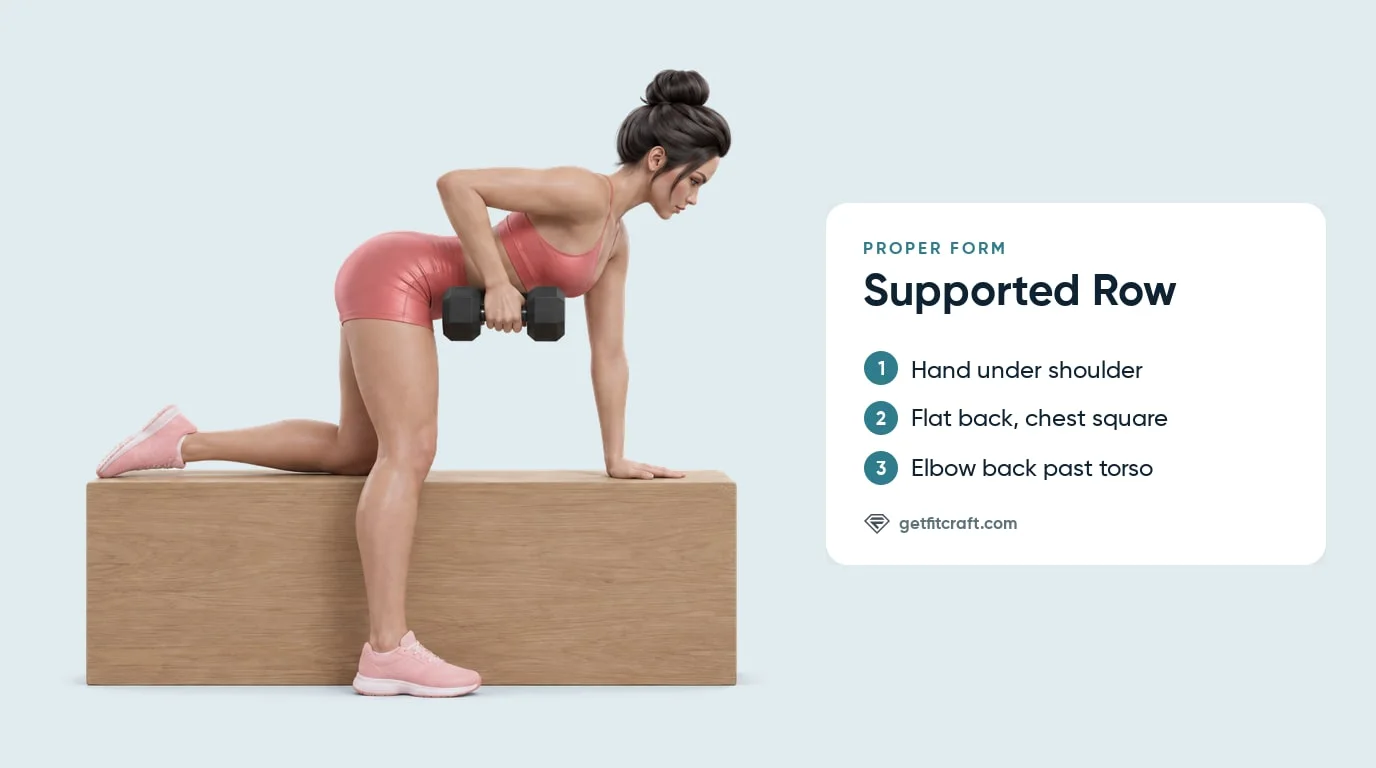
Common Mistakes (and How to Fix Them)
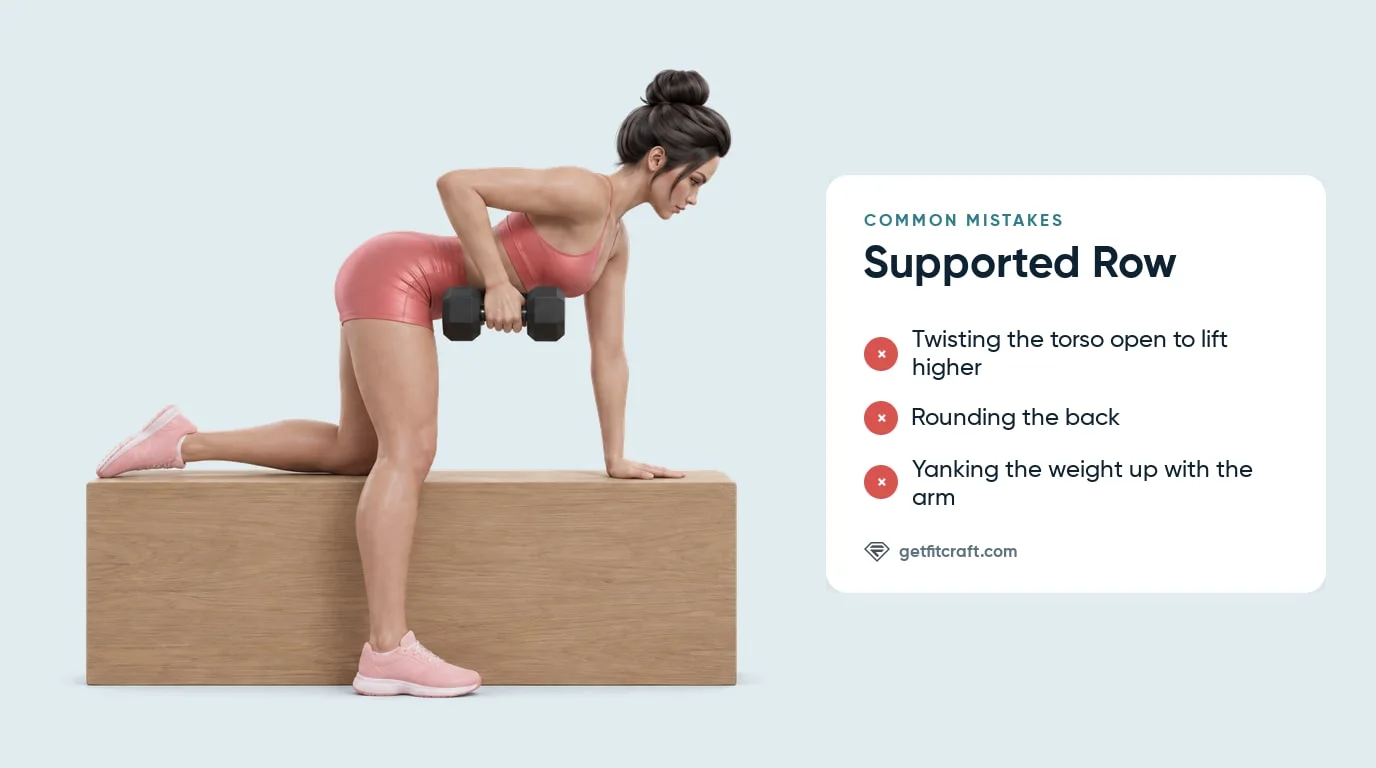
- Yanking the weight up with your arm. Jerking the dumbbell up turns the row into a momentum rep, and if you have to yank it, the dumbbell is too heavy. Fix it by pulling smoothly, driving your elbow up and back.
- Twisting the torso open. Turning your chest open to lift higher twists your trunk under the weight. Keep your chest square to the floor and lift only as high as you can without your torso turning.
- Letting the elbow drift far out from your side. Your elbow should travel back close to your side. Keep it close and row toward your lower ribs and hip.
- Shrugging at the top. If your shoulder rises toward your ear, your shoulder blade has lost its position. Think about sliding the shoulder blade down and back before you squeeze.
- Dropping the weight. The lowering phase still trains the back. Use a controlled descent instead of letting gravity finish the rep.
- Using an unstable support. A wobbly chair or soft surface can move or tip under you. Use a flat bench, sturdy box, or stable surface about knee height that can't move or tip.
Supported Row Variations: Regressions and Progressions
Choose the version that lets you keep your torso still and your chest square to the floor.
Higher-Support Row (Beginner Regression)
Rest your hand and knee on a higher sturdy box or bench that cannot move or tip, so your torso is more upright. This makes the row easier to control.
Standard Bench-Supported Row
Use one hand and the same-side knee on a bench or a sturdy box about knee height, with the opposite foot planted. This is the main version for most lifters because it balances support, range of motion, and load, and it is the version the FitCraft app teaches, rated Intermediate.
Paused Supported Row
Hold the top position for one or two seconds on every rep. The pause makes cheating obvious and increases time under tension for the lats and mid-back.
Slow-Eccentric Supported Row
Lower the dumbbell over three to four seconds. This adds difficulty without needing a much heavier dumbbell, and it teaches control through the full range.
Alternative Pulling Exercises
Use bent-over rows when you can keep your back flat in an unsupported hinge,inverted rows when you want a bodyweight pull, or corner rows when you want a standing bodyweight row.
When to Avoid or Modify Supported Rows
Stop at any pain in a joint, your lower back or your neck. With any of the conditions below, see a doctor or physical therapist before you do supported rows.
- Acute shoulder injury or rotator cuff irritation. Rowing can aggravate an irritated shoulder, and any shoulder pain during a set means stop. Pause rowing until a doctor or physical therapist clears you; they decide how you return.
- Recent shoulder, elbow, wrist, or back surgery. Get clearance from your surgeon or physical therapist before you do supported rows.
- Tennis elbow or golfer's elbow. Gripping and pulling can irritate the elbow tendons. Skip supported rows while your elbow hurts, stop at any elbow pain, and see a doctor or physical therapist before you row again.
- Lower-back pain. Any lower back pain during a set means stop. Skip supported rows and see a doctor or physical therapist before you train your back again.
- Wrist pain. Any wrist pain means stop; see a doctor or physical therapist before you put weight on that hand again.
- Uncontrolled hypertension or cardiovascular disease. Get your doctor's clearance before you do supported rows. Whenever you row, breathe out as you pull and never hold your breath.
Related Exercises
If supported rows fit your training, these exercises build the same pulling pattern or shore up the foundations around it:
- Same muscle group: Bent-Over Rows train the same back muscles from a free-standing hinge, and Overhead Pullovers train the lats.
- Bodyweight and other rows: Inverted Rows and Corner Rows let you practice horizontal pulling with your body weight, and Reverse Rows are a two-arm dumbbell row with your palms facing each other.
- Strength-builder eccentric: Chin Negatives train the lowering strength needed for harder vertical pulls.
- Grip and shoulder foundation: Engaged Hangs and Top Chin Holds build scapular control and grip endurance.
- Core foundation: Deadbugs and Hollow Holds are core exercises to pair with rows.
How to Program Supported Rows
Supported rows follow the same broad progression model used for resistance training. The American College of Sports Medicine (ACSM) Position Stand on resistance training recommends that novices use loads they can lift for 8 to 12 reps per set and train 2 to 3 days per week. For intermediate and advanced lifters, it recommends a wider range of 1 to 12 reps per set, varied over time in a periodized plan. Once you can do one or two reps more than your target, it recommends adding 2 to 10 percent to the load (Ratamess et al., 2009). The table below gives practical starting ranges for each level.
| Level | Sets x Reps | Rest between sets | Frequency |
|---|---|---|---|
| Beginner (higher support or light dumbbell) | 2-3 x 8-12 per side | 60-90 seconds | 2-3 sessions/week |
| Intermediate (standard bench-supported row) | 3-4 x 8-12 per side | 90-120 seconds | 2-3 sessions/week |
| Advanced (paused, slow eccentric, or heavier load) | 3-5 x 4-10 per side | 90-180 seconds | 2-4 sessions/week |
Where in your workout: place supported rows early in an upper-body or pull session, while you're fresh.
Form floor over rep targets: stop the set when your torso twists, your shoulder shrugs, your elbow path changes, or the dumbbell starts dropping on the way down. Clean reps beat extra reps.
How FitCraft Programs This Exercise
Knowing how to row is one piece. Knowing which pulling variation belongs in your week, how many sets to use, and when to progress is where planning matters.
FitCraft uses your free assessment, goals, and available equipment to build a balanced program, and the supported row is one of the intermediate strength exercises it can include, with an interactive 3D demonstration. As you build strength, the app adjusts your training to match your level, and every program is designed by an Ivy League-trained exercise scientist and NSCA-certified strength coach.
Frequently Asked Questions
What muscles does the supported row work?
The supported row primarily trains the latissimus dorsi, middle trapezius, rhomboids, biceps, and posterior deltoids on the rowing side: the lats pull your upper arm back toward your hip, the middle trapezius and rhomboids squeeze your shoulder blade toward your spine, the biceps bend your elbow, and the posterior deltoid draws your arm back. The lower trapezius helps by holding your shoulder blade down so it doesn't shrug toward your ear.
Can I do supported rows with shoulder pain?
No. Skip supported rows while your shoulder hurts or after a recent rotator cuff or labral injury, and stop any set that brings on shoulder pain. See a doctor or physical therapist; they decide when and how you return to rowing.
Why use a supported row instead of a regular bent-over row?
In the supported row, your hand and knee on the bench or box carry your torso, so your lower back does not have to hold a long unsupported hip hinge. That makes it useful when you want to train your back hard but your lower back tires in a free-standing bent-over row or you can't keep your back flat in it. Any lower back pain means stop; see a doctor or physical therapist.
How heavy should I go on supported rows?
Start with a load you can row for 8 to 12 clean reps per side without twisting, shrugging, or losing the top squeeze. If you can't pause briefly at the top, the dumbbell is too heavy.
Is a supported row the same as a one-arm dumbbell row?
They overlap heavily. A supported row means one hand and one knee are braced on a stable surface while the other arm rows a dumbbell. Many coaches also call this a one-arm dumbbell row. The FitCraft app teaches the hand-and-knee version on a box about knee height.