Wheel pose (Urdhva Dhanurasana) is an expert-level yoga backbend that stretches the rectus abdominis, the hip flexors and the latissimus dorsi. From lying on your back with your hands beside your ears, you press through your feet and hands until your body forms an arch with your hips highest. The FitCraft app rates both of its versions Expert: a hold that stays at the top, and a moving version that presses up and lowers each rep. The key cues are feet flat with your knees pointing forward, weight even in both hands, elbows pointing back and no weight on your head at any point, then come down with your chin tucked. Warm up your back and shoulders first. Easier options are a bridge or your hands on sturdy blocks braced against a wall.
Wheel pose is a deep backbend: you press your whole body up from the floor with your hands and feet and arch into it. It asks a lot of your wrists and shoulders, and when your knees or feet splay out, your lower back takes more of the bend. Set up carefully, warm up first, and never put weight on your head.
The FitCraft app has two wheel exercises, both rated Expert: a hold that presses up once and stays at the top, and a moving version that presses up, pauses about 2 seconds at the top, lowers to lying on your back and repeats, about 10 seconds a rep. In both, your feet stay flat on the floor.
Quick Facts: Wheel Pose
- Equipment needed: None (a yoga mat is optional)
- Difficulty: Expert (as rated in the app for both versions)
- Modality: Yoga backbend (a hold or slow reps)
- Body region: Front of the body and sides of the back: stomach, front of the hips and lats (stretched)
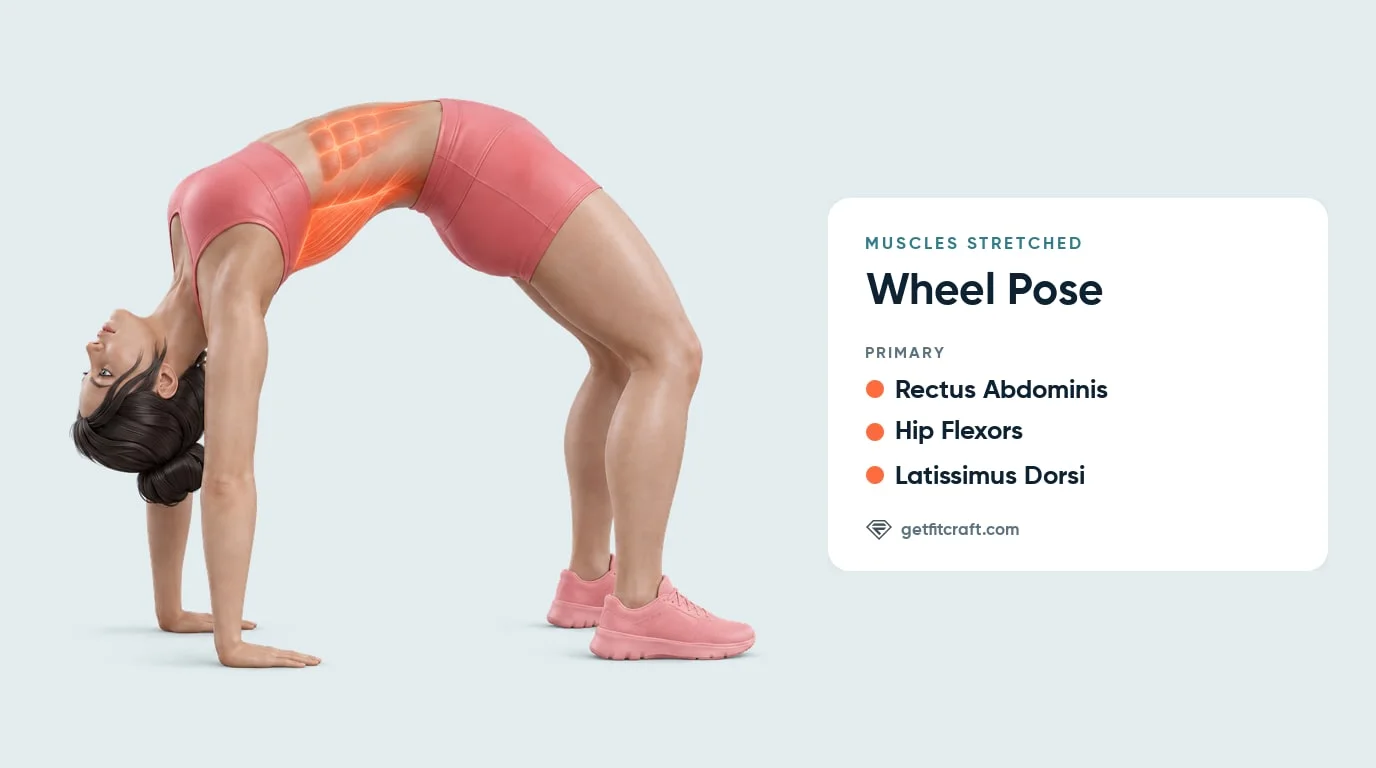
Muscles Stretched
Muscles stretched: the rectus abdominis, the hip flexors and the latissimus dorsi. The rectus abdominis is the long muscle down the front of your stomach, and it lengthens as your spine arches. The hip flexors at the front of your hips stretch as you press your hips up and open them. The latissimus dorsi, or lats, are the big muscles down the sides of your back under your arms, and they stretch as your arms reach overhead and press the floor away.
What your arms and legs do: your hands and feet press into the floor to lift you and hold you up, but wheel pose is a stretch for the three muscles above, not a strength exercise for them. No study we found has measured wheel pose itself, so these descriptions come from the shape of the pose.
Where you should feel it: a stretch across your stomach, the front of your hips and down the sides of your back under your arms. You should not feel it in your lower back, wrists or neck, and any pain there means stop.
Step-by-Step: How to Do Wheel Pose
- Set up on your back. Lie on your back with your knees bent and your feet flat on the floor about hip-width apart, parallel and close to your hips, so your knees sit over your feet.
- Plant your hands by your ears. Bend your elbows and place your palms flat on the floor beside your ears, fingers pointing toward your shoulders and elbows pointing up. Keep your elbows from drifting out wide.
- Lift your hips. Breathe out and press through your feet to lift your hips. Keep your feet and knees pointing forward without splaying.
- Press up into the arch. Press through your hands to lift your upper back and head off the floor, straightening your arms as far as your shoulders allow, so your body forms an arch with your hips highest. Keep your weight even across both hands, your elbows pointing back rather than out, and no weight on your head at any point.
- Hold or move, then come down. For the hold, stay at the top and keep breathing steadily while you press the floor away. For the moving version, pause at the top for about 2 seconds, lower slowly and press up again, about 10 seconds a rep. To come down, tuck your chin, bend your elbows and knees, and lower your upper back to the floor first rather than your head.
Get this exercise in a personalized workout
FitCraft, our mobile fitness app, uses its AI coach Ty to program yoga poses like this into your plan at the right volume and intensity, based on your level, goals, and equipment. Ty was designed and trained by Domenic Angelino, MPH (Brown University) and NSCA-CSCS, with research published in the Journal of Strength and Conditioning Research and Medicine & Science in Sports & Exercise.
Take the Free Assessment Free • 2 minutes • No credit card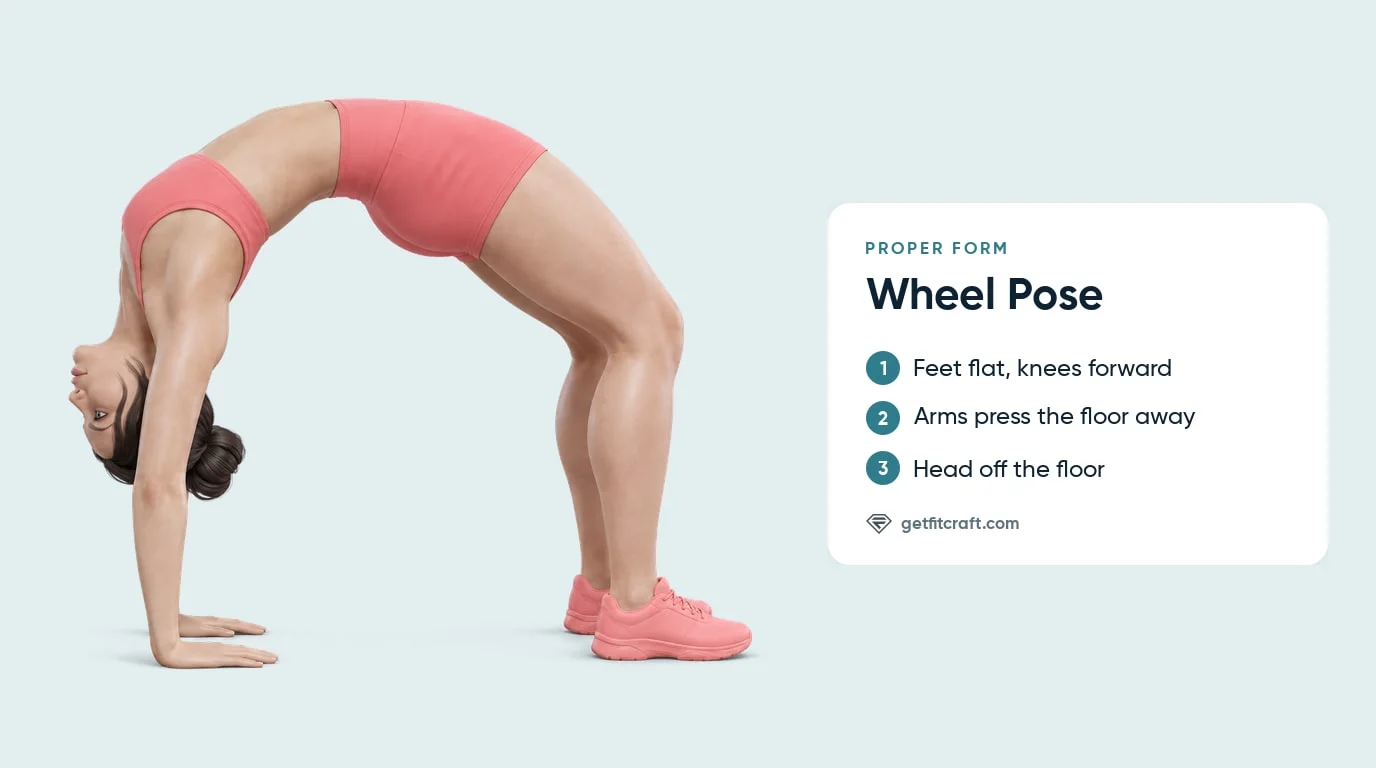
Common Mistakes (And How to Fix Them)
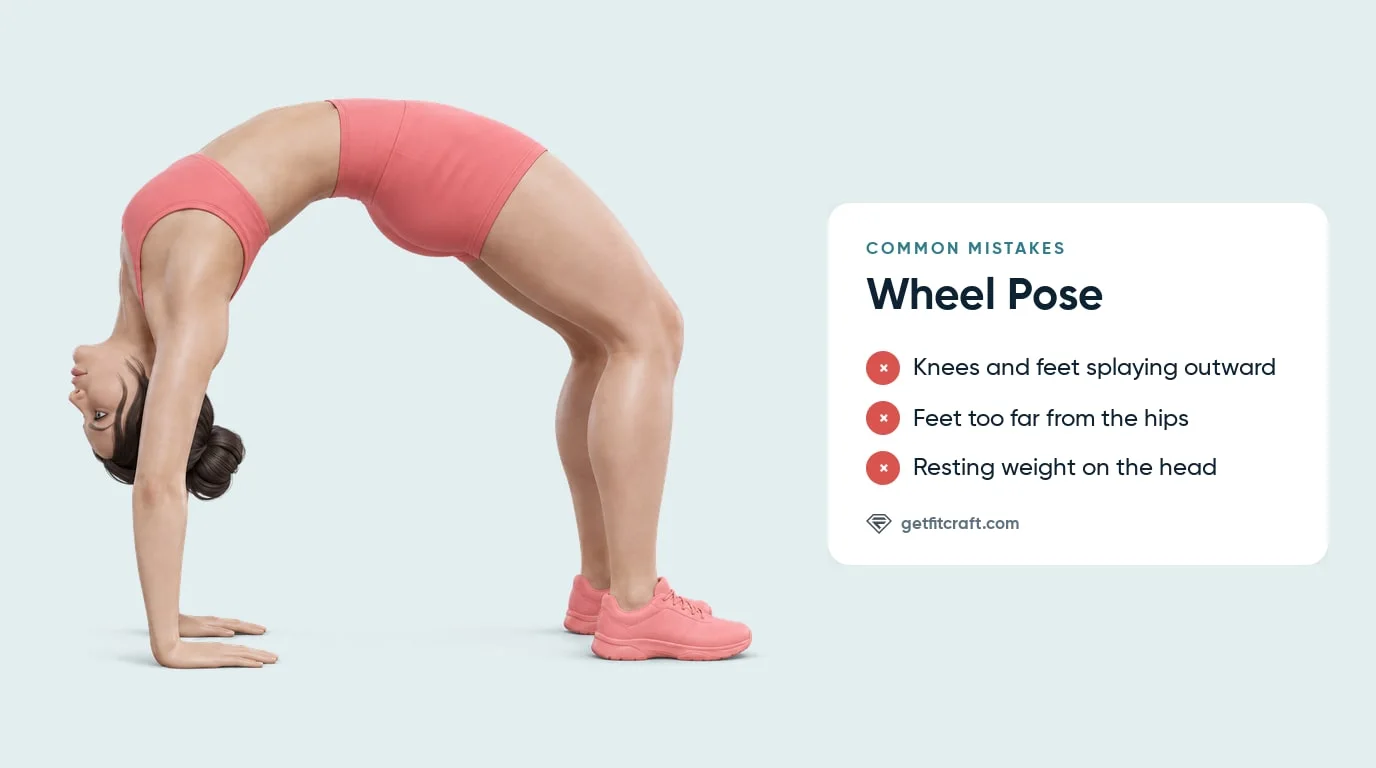
Knees and Feet Splaying Out
What it looks like: your knees fall open and your feet turn out as you press up.
Why it's a problem: splayed knees and feet push more of the bend into your lower back.
The fix: keep your feet hip-width and parallel and your knees pointing forward, and press evenly through both feet. Any pain in your lower back means stop and come down with your chin tucked.
Feet Too Far from Your Hips
What it looks like: your feet sit far from your hips, or slide away as you try to lift.
Why it's a problem: with your feet far from your hips, your knees can't sit over your feet when you set up, and your feet are more likely to slide as you lift.
The fix: reset your feet before each attempt. Keep them hip-width, parallel and close enough to your hips that your knees sit over your feet.
Elbows Flaring Out
What it looks like: your elbows bow out to the sides before or during the press.
Why it's a problem: flared elbows make it harder to straighten your arms and keep your weight even across both hands.
The fix: set your hands beside your ears with your fingers toward your shoulders, and keep your elbows pointing back toward your feet, not out. If your shoulders can't open enough for that, put your hands on sturdy blocks braced against a wall.
Resting Weight on Your Head
What it looks like: you pause on the top of your head with weight on your neck, or your head sinks toward the floor at the top.
Why it's a problem: wheel pose is not a head-supported pose, and your neck should never carry your weight.
The fix: press through your hands to lift your upper back and head off the floor, and let your head hang freely between your arms. If you can't press up without weight on your head, come down and use an easier option.
Sagging Instead of Pressing
What it looks like: you relax at the top and sink down toward your head and neck.
Why it's a problem: wheel is held by pressing your hands and feet into the floor, so relaxing lets the arch sink toward your neck.
The fix: keep pressing the floor away through your hands and feet while you breathe. If holding gets too hard, tuck your chin and lower down with control.
Coming Down onto Your Head
What it looks like: you drop out of the arch and land on the top of your head.
Why it's a problem: it puts your weight on your neck at the end of the pose.
The fix: tuck your chin, bend your elbows and knees, and lower your upper back to the floor first, then your hips.
Holding Your Breath
What it looks like: you press up, brace hard, and stop breathing.
Why it's a problem: wheel should be held with slow, steady breathing, and if you can't breathe, you're straining.
The fix: breathe out as you press up and keep breathing slowly and steadily at the top. If you can't keep breathing steadily, tuck your chin and come down.
Wheel Pose Variations: Easier, App and Harder Versions
Bridge Pose (Easier)
Bridge is the main easier option. Your shoulders and head stay on the floor while your hips lift, so your wrists and shoulders carry no weight.
Hands on Blocks Against a Wall (Easier)
Brace two sturdy yoga blocks against a wall and put your hands on them. The higher hand position means your shoulders don't have to open as far, so you can practice the press without forcing depth.
Wheel Hold (Expert in the App)
Press through both hands and feet, lift your hips highest, and hold the top for a few calm breaths while you keep pressing the floor away. This is the version most people mean when they say Urdhva Dhanurasana. The app's 3D demonstration keeps both feet flat about hip-width apart, the knees slightly bent and the elbows bent; straighter arms are fine too, as long as your elbows point back.
Moving Wheel (Expert in the App)
Press up into the wheel, pause at the top for about 2 seconds, then tuck your chin and lower to lying on your back with control, about 10 seconds a rep. Rest for a moment on the floor before you press up again.
Longer Hold or Feet Closer (Harder)
Hold the top for longer, breathing steadily with your weight even in your hands and feet. Or, at the top, walk your feet a little closer to your hands while your shins and forearms stay upright.
When to Avoid or Modify Wheel Pose
A stretch across your stomach, the front of your hips and the sides of your back is normal in wheel pose. Any pain in your wrists, lower back, neck or shoulders means stop and come down with your chin tucked, and so does feeling dizzy, lightheaded or pressure in your head. If any of the following applies to you, see a doctor or physical therapist before you do wheel pose.
- Lower back pain, disc symptoms, or spondylolisthesis. Skip wheel pose and see a doctor or physical therapist before you do it or any other deep backbend, and ask them which exercises suit you. Any lower back pain during the pose means stop.
- Wrist pain or a recent wrist injury. Wheel puts your weight on your hands with your wrists bent back. See a doctor or physical therapist before you try it. Any wrist pain means stop.
- Shoulder pain, impingement, or a recent shoulder injury. See a doctor or physical therapist before you try wheel pose, and ask them whether overhead positions suit you. Any shoulder pain means stop.
- Neck injury or chronic neck pain. See a doctor or physical therapist before you try wheel pose. Never put weight on your head. Any neck pain means stop.
- Uncontrolled high blood pressure, glaucoma, recent eye surgery, or high pressure in the eyes. In wheel pose your head hangs lower than your hips. Get clearance from your doctor before you try it. Dizziness or pressure in your head means stop.
- Pregnancy. Check with your doctor or midwife before you do wheel pose, and ask them which exercises suit each stage of your pregnancy. Any pain in your back, belly or pelvis, or feeling dizzy, means stop.
- Active migraine, sinus infection, or heart disease. Check with your doctor before you do wheel pose. Dizziness or pressure in your head means stop.
Related Exercises
These exercises make easier steps toward wheel, warm up the areas it uses, or pair well with it:
- Easier options: Glute Bridges lift your hips with your shoulders and head on the floor, the main easier option for wheel. Cobra Pose and Cat-Cow are gentler backbends on the floor.
- Shoulder warm-up: Downward Dog, Shoulder Rolls, Rotator Cuff Stretch, and Seated Rear Delt Stretch can be part of warming up your shoulders before wheel.
- Core strength: Forearm Planks, Hand Planks, and Hollow Holds are core strength exercises you can pair with wheel in the same session.
- Back strength: Superman Holds and Back Extensions strengthen the muscles along your spine without the hands-and-feet press of wheel.
- Kneeling backbend: Camel Pose is a kneeling backbend, rated Intermediate in the app, with your hands resting on your heels instead of pressing the floor. Get comfortable with it before you try wheel.
- Inversion comparison: Shoulder Stand Pose is an inversion with its own neck safety rules, a different pattern from wheel.
How to Program Wheel Pose
Wheel pose is programmed by holds or slow reps, not by sets of strength reps. Yoga Journal places it at the end of a practice, once you're warm (Yoga Journal). Hold only as long as you can breathe steadily with your weight in your hands and feet. In the app's moving version, each rep takes about 10 seconds, with a pause of about 2 seconds at the top.
| Version | Holds or reps | Rest between sets | Frequency |
|---|---|---|---|
| Easier (bridge, or hands on blocks braced against a wall) | 1-2 holds for a few steady breaths | 60-90 seconds or full breath recovery | 2-3 sessions/week |
| Wheel hold (Expert in the app) | 2-3 holds, each as long as you breathe steadily with your weight in your hands and feet | 60-120 seconds | 3-4 sessions/week |
| Moving wheel (Expert in the app) | A few slow reps of about 10 seconds, pausing about 2 seconds at the top | 60-120 seconds | 3-4 sessions/week |
| Harder (longer hold, or feet a little closer to the hands) | 2-4 longer holds, breathing steadily | 90-180 seconds | 3-5 sessions/week if recovery stays good |
Where in your workout: practice wheel near the end of a yoga session, after the shoulders, spine, wrists, hips, and core are warm. Prepare with shoulder openers, cat-cow, cobra, bridge, and a few neutral-spine resets.
Form floor over time targets: end the hold when your elbows flare, your knees fall open, your breath tightens or the exit starts to feel rushed, and stop for any pain in your lower back, wrists, shoulders or neck. A short clean hold beats a longer hold with broken form.
How FitCraft Programs This Exercise
FitCraft maps your level, goals, and equipment during the diagnostic and builds a plan around them. The app has two wheel exercises, the hold and the moving version, both rated Expert, and can include them in your plan.
Its 3D demonstrations show the app's version: pressing up from lying on the back, both feet flat about hip-width apart, the knees slightly bent and pointing forward, the hips highest and the elbows bent. For a pose like wheel, build up through the easier options and warm up first instead of chasing a deeper arch.
Frequently Asked Questions
What muscles does Wheel pose stretch?
Wheel pose stretches the rectus abdominis, the hip flexors and the latissimus dorsi. Your stomach muscle (rectus abdominis) lengthens as your spine arches, the front of your hips (hip flexors) stretches as your hips press up, and the lats, the big muscles down the sides of your back under your arms, stretch as your arms reach overhead and press the floor away. Your arms and legs press to hold you up, but the pose is a stretch for these three muscles, not a strength exercise for them.
Can I do Wheel pose with lower back pain?
No. Skip wheel pose while you have lower back pain, disc symptoms or spondylolisthesis, and see a doctor or physical therapist before you do it or any other deep backbend, and ask them which exercises suit you. Any pain in your lower back during the pose means stop and come down with your chin tucked.
What is the difference between Bridge and Wheel pose?
Bridge keeps the shoulders and upper back on the floor while the hips lift, so the shoulder and wrist demand is low. Wheel presses through both hands and feet, lifts the head and torso, and creates a much deeper backbend that requires more shoulder flexion, wrist extension, and upper-body strength.
How do I progress from Bridge to Wheel pose?
Start with a bridge, keeping your shoulders and head on the floor while you lift your hips. Next, try wheel with your hands on two sturdy blocks braced against a wall, so your shoulders don't have to open as far. Move to the full wheel when you can press up with your knees pointing forward, your elbows pointing back, no weight on your head and no pain in your lower back, wrists or shoulders. Warm up your back and shoulders first every time.
Why can't I straighten my arms in Wheel pose?
You don't have to. The app's 3D demonstration keeps the elbows bent at the top. Straighten your arms as far as your shoulders allow; slightly bent arms are fine as long as your weight stays in your hands and feet and your elbows point back toward your feet rather than out to the sides. Hands on sturdy blocks braced against a wall mean your shoulders don't have to open as far.