
Quick Facts: Leg Raises
Quick Facts: Leg Raises
- Equipment needed: Bodyweight only (mat optional for spinal comfort).
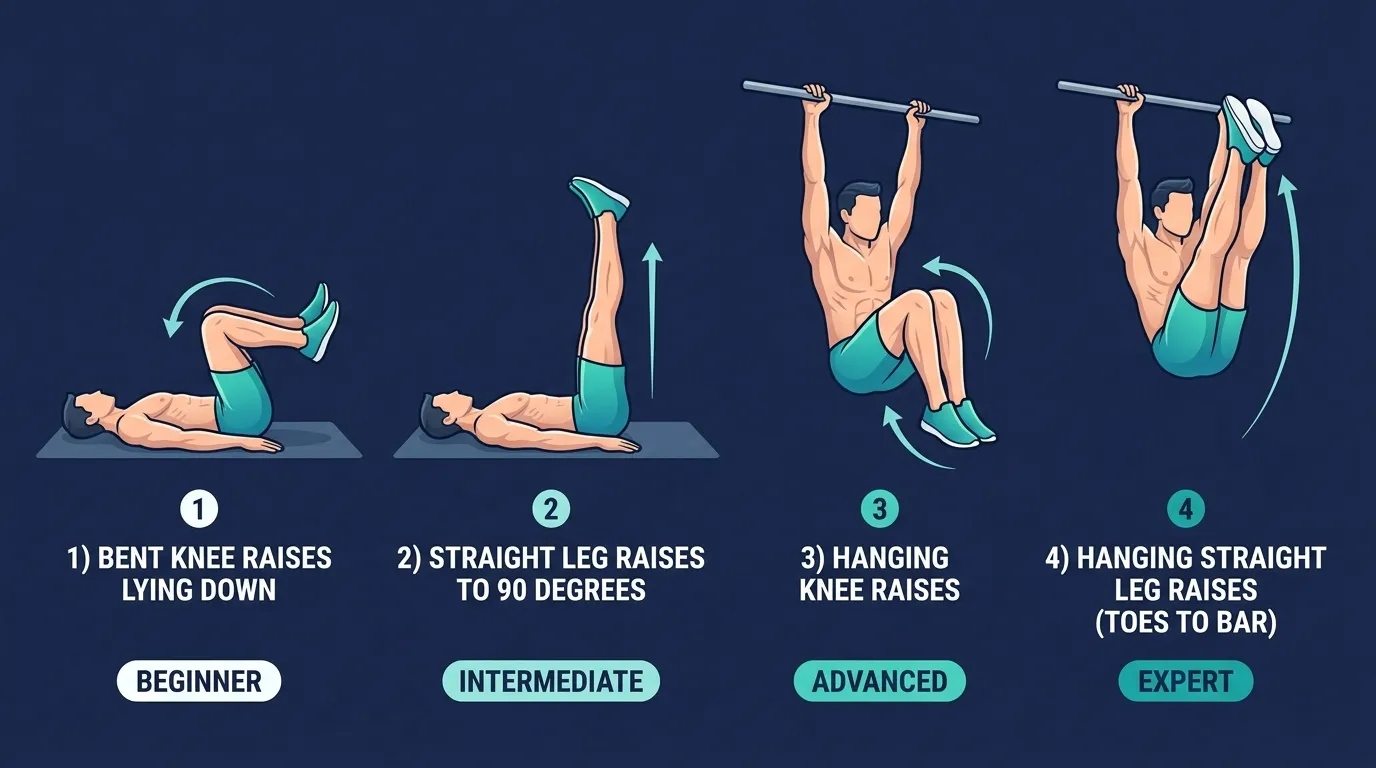
- Difficulty: Intermediate. The bent-knee regression brings it down to beginner; hanging and weighted variations move it to advanced.
- Modality: Strength endurance (dynamic, controlled-tempo core).
- Body region: Anterior core (lower abdominals and hip flexors).
- FitCraft quest category: Core stability.
Muscles Worked
Primary movers. The lower fibers of the rectus abdominis and the hip flexors (iliopsoas and rectus femoris) do the lifting. The hip flexors raise the legs toward the torso concentrically. The lower rectus abdominis works hardest in the eccentric (lowering) phase, where it has to fight the lever arm of two long legs trying to pull the pelvis into anterior tilt.
Secondary movers. The upper rectus abdominis assists by maintaining the posteriorly tilted pelvis. The obliques fire to keep the legs from drifting apart or rotating. The quadriceps stay tense to hold the knees in extension.
Stabilizers. The diaphragm and pelvic floor (the deep core canister) maintain intra-abdominal pressure so the lumbar spine stays neutral against the load. The transverse abdominis fires deeply to lock the pelvis in posterior tilt. The breath itself is a stabilizer: exhaling forcefully through the lift reinforces transverse abdominis activation, which is why most beginners feel weaker when they hold their breath.
Mechanism. Leg raises load the anterior core through hip flexion under a long lever. The longer the legs (knees straight), the longer the lever arm and the harder the deep core has to work to keep the pelvis in posterior tilt. When the deep core fails, the lumbar spine arches and the load shifts from the abs to the lumbar vertebrae. That is why "keep the lower back flat" is the entire safety rule for this exercise. A bent knee shortens the lever and lowers the demand, which is why bent-knee leg raises are the universal regression.
Step-by-Step Instructions
- Lie flat on your back. Find a firm, flat surface; a mat on the floor is ideal. Lie with your legs fully extended and together, toes pointed or feet flexed (either works). Place your arms at your sides with palms flat on the ground. Coach Ty's cue: "Hands at your sides for support. Your palms pressing into the floor give you stability and help you hold the flat-back position."
- Press your lower back into the floor. This is the most important setup cue. Actively press your lower back into the ground by engaging your deep core muscles. You should not be able to slide a hand under your lower back. Maintain this flat-back position throughout every rep. Coach Ty's cue: "Keep your lower back pressed against the ground to protect your spine and isolate your core."
- Engage your core and lift your legs. Keeping your legs straight and together, slowly raise them toward the ceiling. Imagine pulling your belly button toward your spine as your legs lift. Control the movement with your abs; don't swing or use momentum. Coach Ty's cue: "Engage your core as you lift your legs. Imagine pulling your belly button toward your spine. And breathe out forcefully on the way up to engage the core even more."
- Lift to vertical (or as high as your form allows). Ideally, raise your legs until they're perpendicular to the floor (90 degrees). If your lower back starts to arch before you reach that point, that's your current range of motion. Work within it. Coach Ty's cue: "Try to keep your legs straight as you lift them. And keep your legs together. Legs drifting apart reduces tension on the core."
- Pause briefly at the top. Hold for one second at the top of the movement, squeezing your abs. This pause eliminates momentum and maximizes muscle engagement. Coach Ty's cue: "Add a pause at the top before lowering for an extra challenge."
- Lower with control. Slowly lower your legs back toward the ground, taking 2 to 3 seconds on the descent. Stop just before your feet touch the floor to maintain continuous tension on your core. This is where most of the work happens. Don't rush it.
Get this exercise in a personalized workout
FitCraft, our mobile fitness app, uses its AI coach Ty to program core stability work like this into your plan at the right volume and intensity, based on your level, goals, and equipment. Ty was designed and trained by Domenic Angelino, MPH (Brown University) and NSCA-CSCS, with research published in the Journal of Strength and Conditioning Research and Medicine & Science in Sports & Exercise.
Take the Free Assessment Free · 2 minutes · No credit card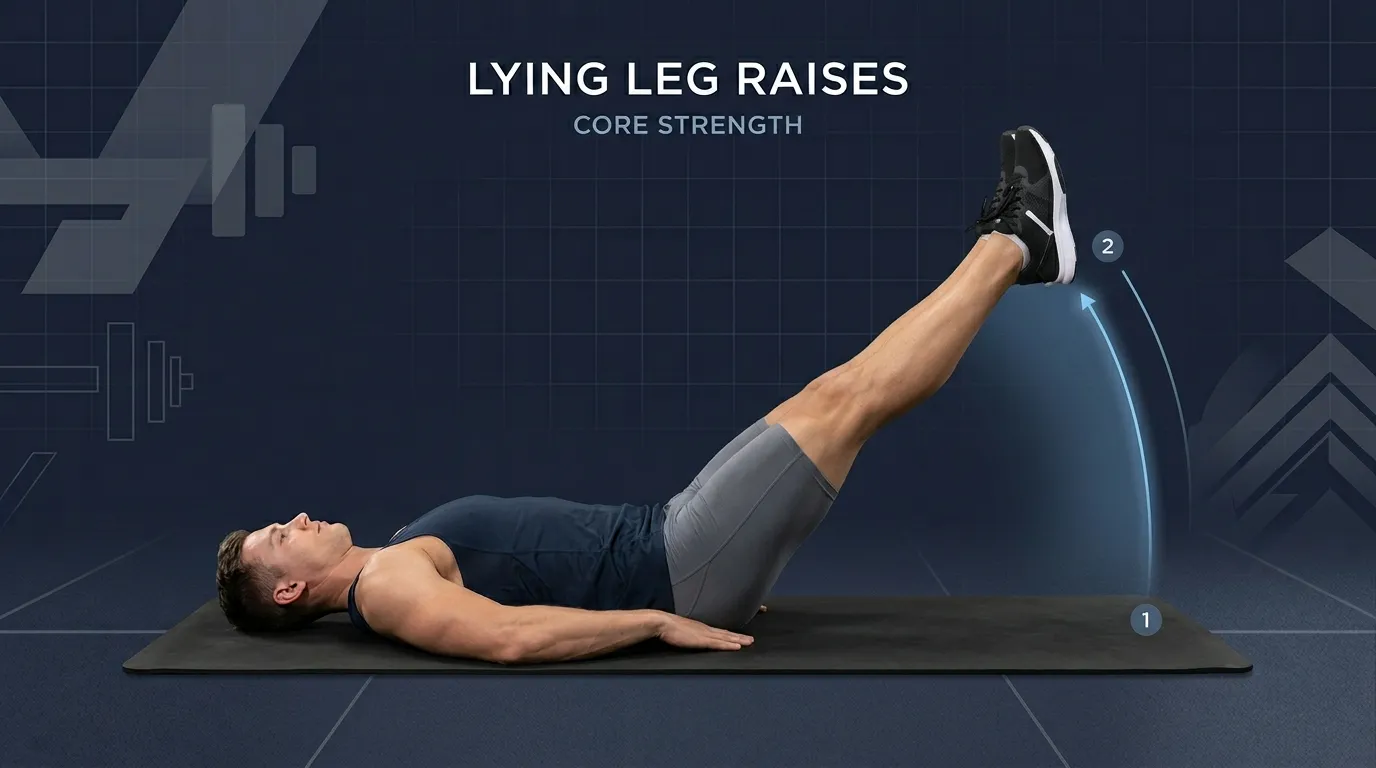
Common Mistakes
- Lower back arching off the floor. This is the most common and most dangerous mistake. When your lower back lifts, your hip flexors take over and your lumbar spine bears the load. Press the lower back flat and reduce the range of motion if needed. Coach Ty's cue: "If your back lifts off the floor, shorten your range or bend your knees. That arch is the failure point of the exercise."
- Using momentum to swing legs up. Swinging bypasses the muscles you're trying to train. If you need momentum to lift, the exercise is too hard at that range; shorten it.
- Dropping legs too fast on the descent. The lowering phase is where the most muscle activation happens. If you let gravity do the work, you waste half the rep. Lower slowly and with control.
- Holding your breath. Breath-holding during core exercises spikes intra-abdominal pressure and can spike blood pressure. Exhale forcefully as you lift, inhale as you lower.
- Bending the knees excessively. A slight knee bend is fine for beginners, but significant bend shortens the lever so much that the lower abs barely work. Aim for the straightest legs your core strength allows.
Variations
- Reverse crunches (easier, smarter starting point if your back hurts). Bend the knees and lift the pelvis off the floor at the top. The shorter lever cuts hip-flexor demand and shifts the work to the lower abs through a stronger contraction.
- Bent-knee leg raises (easier). Perform the same movement with knees bent at 90 degrees. This shortens the lever arm and reduces core demand. Ideal for beginners building foundational strength.
- Single-leg raises (easier). Raise one leg at a time while the other stays on the ground. This halves the load and is a good stepping stone toward the full two-leg version.
- Leg raises with hip lift. At the top of the movement, lift your hips off the floor by pressing your feet toward the ceiling. Adds a reverse crunch component and increases upper-ab engagement.
- Hanging leg raises (harder). Perform the movement while hanging from a pull-up bar. A significant progression that adds grip strength demand and allows a greater range of motion.
- Weighted leg raises. Hold a light dumbbell or medicine ball between your feet. The added load makes each rep significantly more challenging.
When to Avoid or Modify Leg Raises
Leg raises are safe for most healthy adults, but several conditions warrant modification or substitution. Always consult your physician or physical therapist before starting or returning to a core training program, especially if you have any of the following.
- Acute lower-back pain or known disc pathology. Leg raises load the lumbar spine through hip flexion under a long lever. If the deep core cannot hold the pelvis flat, the lumbar vertebrae take the load. Skip leg raises until the acute pain resolves and a PT clears you. Start instead with deadbugs and bird-dogs to rebuild deep-core control.
- First 6 to 8 weeks postpartum or active diastasis recti. The intra-abdominal pressure from holding two long legs against gravity can widen abdominal separation. Restore deep-core function first with diaphragmatic breathing, transverse abdominis activation, and bird-dogs or deadbugs. Reintroduce leg raises only at the bent-knee or single-leg level once the abdominal wall stays flat under load.
- Recent abdominal surgery (C-section, hernia repair, appendectomy). Get clearance from your surgeon. Most post-surgical protocols start with diaphragmatic breathing, then gentle bracing, then progressive loading. Leg raises sit late in that progression.
- Hernia (umbilical, inguinal, ventral). The pressure spike during the lift can worsen symptoms. Consult your physician about safe core alternatives.
- Pregnancy (second and third trimesters). Avoid supine positions for long durations (vena cava compression) and avoid high intra-abdominal-pressure movements. Switch to upright or side-lying core work; consult your provider.
- Pelvic-organ prolapse or pelvic-floor dysfunction. Leg raises generate strong downward pressure on the pelvic floor. Work with a pelvic-floor PT before adding them back.
- Hip flexor strain or chronic hip flexor tightness. Leg raises load the iliopsoas directly. If the hip flexors are inflamed, switch to reverse crunches until the irritation settles.
Related Exercises
- Same plane (anterior core flexion): Crunches, partial crunches, and reverse crunches work the same anterior core but from the shoulder end (crunches) or with the pelvis lifting (reverse crunches) instead of the legs.
- Rotational core pairing: Bicycle crunches add a rotation component to the same lying core work; commonly paired with leg raises in an ab circuit.
- Foundation for spinal bracing: Deadbugs and bird-dogs are the universal foundations. Build the deep-core control there before pushing leg raises hard. Deadbugs in particular train the exact pattern leg raises demand: pelvis locked in posterior tilt while the legs move.
- Easier regression: Reverse crunches and the bent-knee leg raise variation cut the lever arm and the hip-flexor demand. Use these if straight-leg raises trigger any back complaint.
- Advanced progression: Hanging leg raises add grip and a longer range of motion. The natural next step once 3 sets of 15 floor leg raises feel light.
- Glute foundation (often paired): Glute bridges train the hip-extension pattern that balances the hip-flexion bias of leg raises. Pair them so the front and back of the pelvis develop together.
- Posterior balance: Bird-dog crunch and the dynamic bird-dog progressions balance the anterior pulling pattern with posterior chain work.
How to Program Leg Raises
Leg raises fit the dynamic rep-based core protocol described in the ACSM Position Stand on resistance training (Ratamess et al., 2009). They are a low-load, high-control movement, so volume can be relatively high once form is solid. The constraint is always the lower back staying flat, not the rep count.
| Level | Sets × Reps | Rest between sets | Frequency |
|---|---|---|---|
| Beginner (bent-knee or single-leg) | 2-3 × 8-12 | 45-60s | 2-4 sessions/week |
| Intermediate (straight-leg lying) | 3 × 10-20 | 45-60s | 3-5 sessions/week |
| Advanced (hanging, weighted, slow tempo) | 3-4 × 15-30 (slow tempo) | 60s | 4-6 sessions/week |
Where in your workout. Place leg raises at the end of a resistance-training session, not the beginning. Pre-fatiguing the core compromises spinal stability under heavier compound lifts and trades a small core stimulus for a real safety risk. Leg raises also fit well in a standalone "core finisher" alongside planks and bicycle crunches, or as part of a 5 to 10 minute daily core routine paired with deadbugs and bird-dogs.
Form floor over rep targets. End the set the moment your lower back starts to arch off the floor. A clean set of 8 reps with the lumbar spine pinned beats a sloppy set of 20 where the back is arching and the hip flexors are doing the work. Volume is meaningless without the position.
How FitCraft Programs This Exercise
Leg raises are a core staple, but their placement, volume, and variation need to match your current ability. FitCraft's AI coach Ty uses a personalized diagnostic to set the right starting point and progression path from day one.
If your assessment shows limited core strength, Ty starts you with bent-knee leg raises or single-leg raises, building the foundation before introducing the full movement. As your strength progresses, Ty transitions you to straight-leg raises and adjusts the variation and volume to match your level. That might mean pauses at the top, slower tempo, hip lifts, or hanging variations once you have access to a bar.
Leg raises typically appear in dedicated core blocks at the end of your workout, often paired with complementary exercises like planks or bicycle crunches for a well-rounded ab circuit. Every placement decision is grounded in exercise science and shaped by an Ivy League-trained exercise scientist and NSCA-certified strength coach.
FitCraft's gamification system (streaks, quests, and collectible cards) keeps you showing up for the core sessions that are easy to skip. Visible abs aren't built in one great workout. They're built by showing up consistently, week after week. That's what FitCraft is designed to make happen.
Frequently Asked Questions
Can I do leg raises with lower back pain?
Not until the acute pain resolves and a physical therapist clears you. Leg raises load the hip flexors, which attach to the lumbar spine; if your deep core cannot hold the lower back flat against the floor, the load transfers directly to the lumbar vertebrae. Start with deadbugs and bird-dogs to rebuild deep-core control, then return to leg raises with the bent-knee regression and a short range of motion.
Are leg raises good for lower abs?
Yes. Leg raises emphasize the lower portion of the rectus abdominis more than crunches do. You cannot completely isolate the lower abs from the upper abs (the rectus abdominis is one continuous sheet), but lifting the pelvis and legs against gravity biases the lower fibers in a way shoulder-curling movements cannot.
Why does my lower back hurt during leg raises?
It means your lower back is arching off the floor. The deep core is not strong enough to hold the pelvis in posterior tilt while the legs lower, so the lumbar spine takes the load. Fix it by pressing the lower back flat, placing the hands under the hips for tactile feedback, shortening the range of motion, or bending the knees to reduce the lever arm.
How many leg raises should I do as a beginner?
Start with 2 to 3 sets of 8 to 12 reps with knees bent at 90 degrees. If you cannot keep the lower back pressed flat for 8 bent-knee reps, drop to single-leg raises until that control develops. Spinal safety beats rep count every session.
Leg raises vs reverse crunches: what is the difference?
Leg raises keep the pelvis on the floor and move the legs through space; the lower abs work to control the descent. Reverse crunches lift the pelvis off the floor at the top by curling the tailbone toward the ribs; that extra range adds a stronger contraction of the lower rectus abdominis. Reverse crunches are usually a smarter starting point if leg raises trigger back pain, because the shorter lever arm means less hip-flexor demand.