If you can hold a side plank without your hips sagging, the side plank raise is the next step. It keeps the same braced lateral-core position, then adds a controlled hip dip and lift.
That small motion changes the demand. Your bottom-side obliques and gluteus medius have to control the lowering phase, then shorten to lift your hips back to the straight line.
The goal is control, not speed. A clean rep looks quiet: shoulder stacked, ribs stacked, hips moving straight down and up.
Quick Facts: Side Plank Raise
- Equipment needed: None
- Difficulty: Advanced (as rated in the FitCraft app)
- Modality: Core strength
- Body region: Core and hips
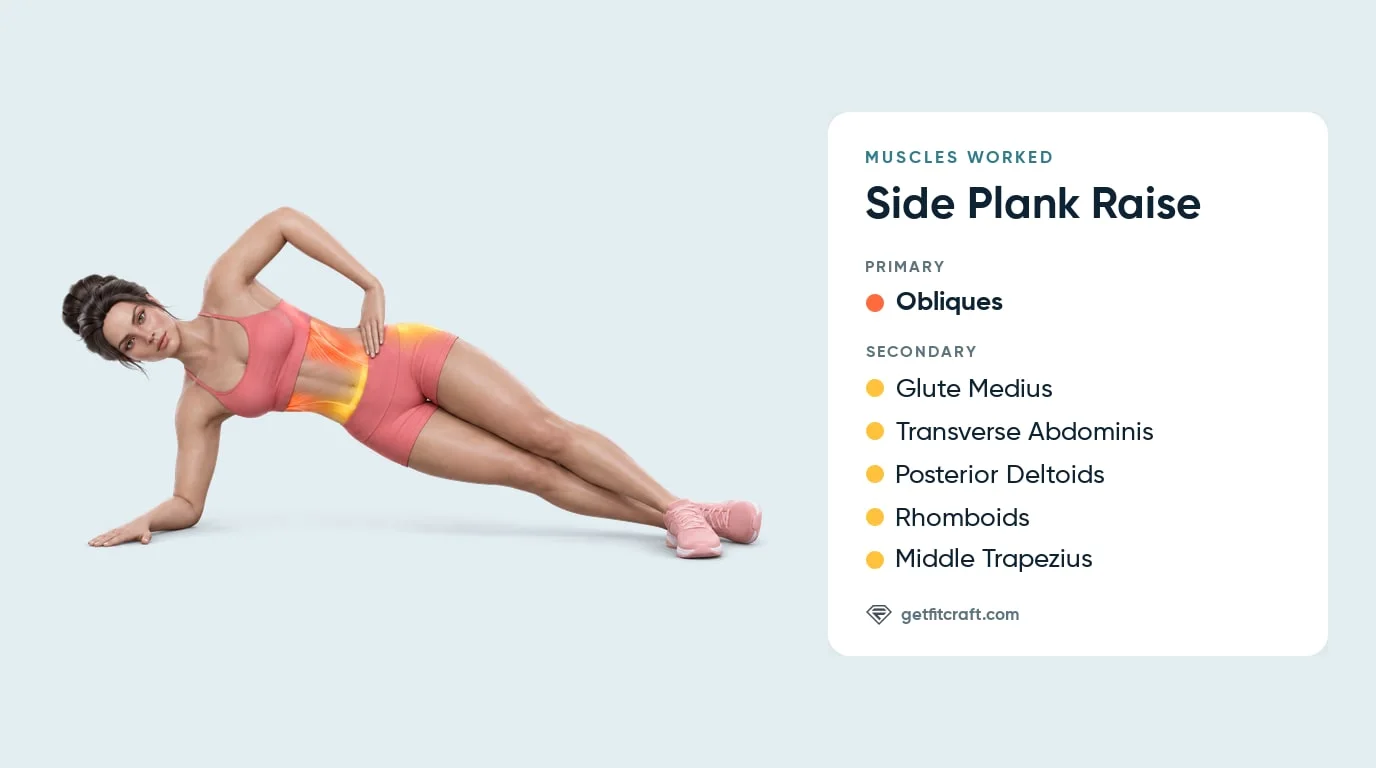
Muscles Worked
Primary muscles: the obliques, the internal and external obliques along the sides of your waist. The obliques on the side nearest the floor control the lowering as your hips dip toward the floor, then lift your hips back to one straight line.
Secondary muscles: the glute medius, the transverse abdominis, the posterior deltoids, the rhomboids, and the middle trapezius. The glute medius, on the side of your bottom hip, helps lift your hips and hold your pelvis up. The transverse abdominis, the deepest layer of your core, braces your trunk so it moves as one piece. The posterior deltoids (the backs of your shoulders) and the rhomboids and middle trapezius (between your shoulder blades) hold your shoulders back and your chest open: they keep the top elbow back while your hand rests on your hip and keep the supporting shoulder blade set, so your trunk does not roll forward as your hips move.
Why the movement works: the side plank raise turns the side plank's hold into a slow, controlled lowering and lifting of the hips. The obliques and the side of your hip do that work while the rest of your body holds still. Keep your elbow under your shoulder and your chest open, and the work stays on the sides of your waist instead of spilling into the lower back or shoulder.
Step-by-Step: How to Perform a Side Plank Raise
The side plank raise is a dynamic rep rather than a hold. Each rep lowers the hips toward the floor and lifts them back up while your torso stays square.
Step 1: Set Up in a Side Plank Position
Lie on your side with your forearm flat on the floor and your elbow directly beneath your shoulder. Point your forearm straight ahead, perpendicular to your body. Keep your legs straight with your feet stacked, or stagger the top foot slightly in front for more stability. Rest your top hand on your hip, or reach it toward the ceiling. Doing the raise on your hand, with your arm straight under your shoulder, also works if your wrist feels good.
Form tip: keep your elbow directly under your shoulder. It is the base for every rep.
Step 2: Brace Your Core and Squeeze Your Glutes
Before you lift, create tension through your trunk and hips. Brace your core as if you're about to take a punch, squeeze your glutes, and keep your chest open. This setup keeps your torso from rotating during the raise.
Step 3: Lift Your Hips to the Starting Position
Press through your forearm and the side of your bottom foot to lift your hips off the floor. Your body should form a straight line from head to heels. Pause briefly to check that your shoulder, hip, and ankle are stacked.
Step 4: Lower Your Hips Toward the Floor
Lower your bottom hip toward the floor with control, taking about a second. Let it lightly touch the floor or stop just above it; both are fine. Don't let your hips drop or collapse onto the floor.
Form tip: lower your hips with control, never drop.
Step 5: Drive Your Hips Back Up
Breathe out and lift your hips back up, taking about a second, until your body makes one straight line from head to heels. A touch higher is fine, but don't hike your hips so high that your body bends the other way. Keep your chest open so you don't roll forward or back.
Form tip: breathe out as your hips lift and in as they lower, and never hold your breath.
Step 6: Repeat, Then Switch Sides
Perform all reps on one side before switching. Match your rep count on both sides. If the left side can only manage 8 clean reps, do 8 on both sides until they even out.
Get this exercise in a personalized workout
FitCraft, our mobile fitness app, uses its AI coach Ty to program core stability work like this into your plan at the right volume and intensity, based on your level, goals, and equipment. Ty was designed and trained by Domenic Angelino, MPH (Brown University) and NSCA-CSCS, with research published in the Journal of Strength and Conditioning Research and Medicine & Science in Sports & Exercise.
Take the Free Assessment Free · 2 minutes · No credit card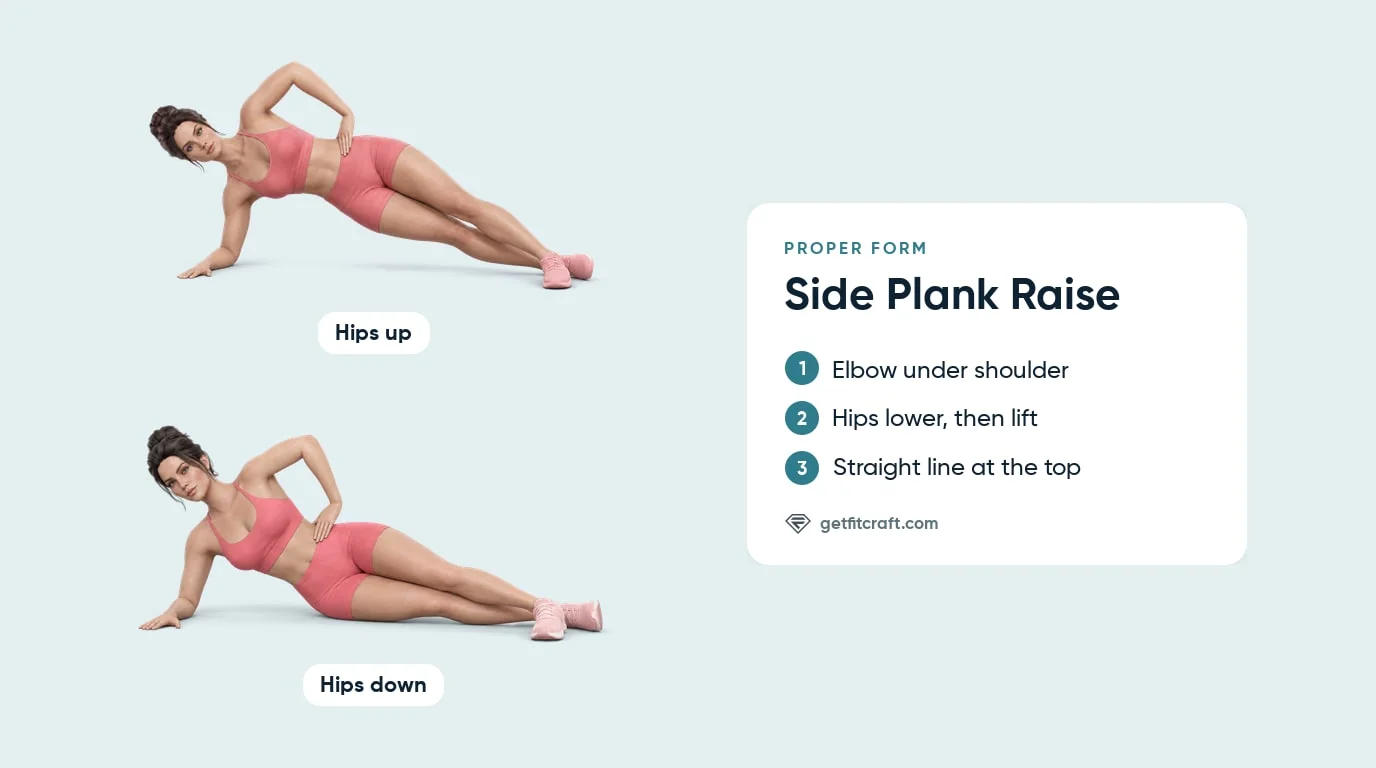
Common Mistakes (and How to Fix Them)
The side plank raise asks for stability and motion at the same time. These are the mistakes that usually break the rep.
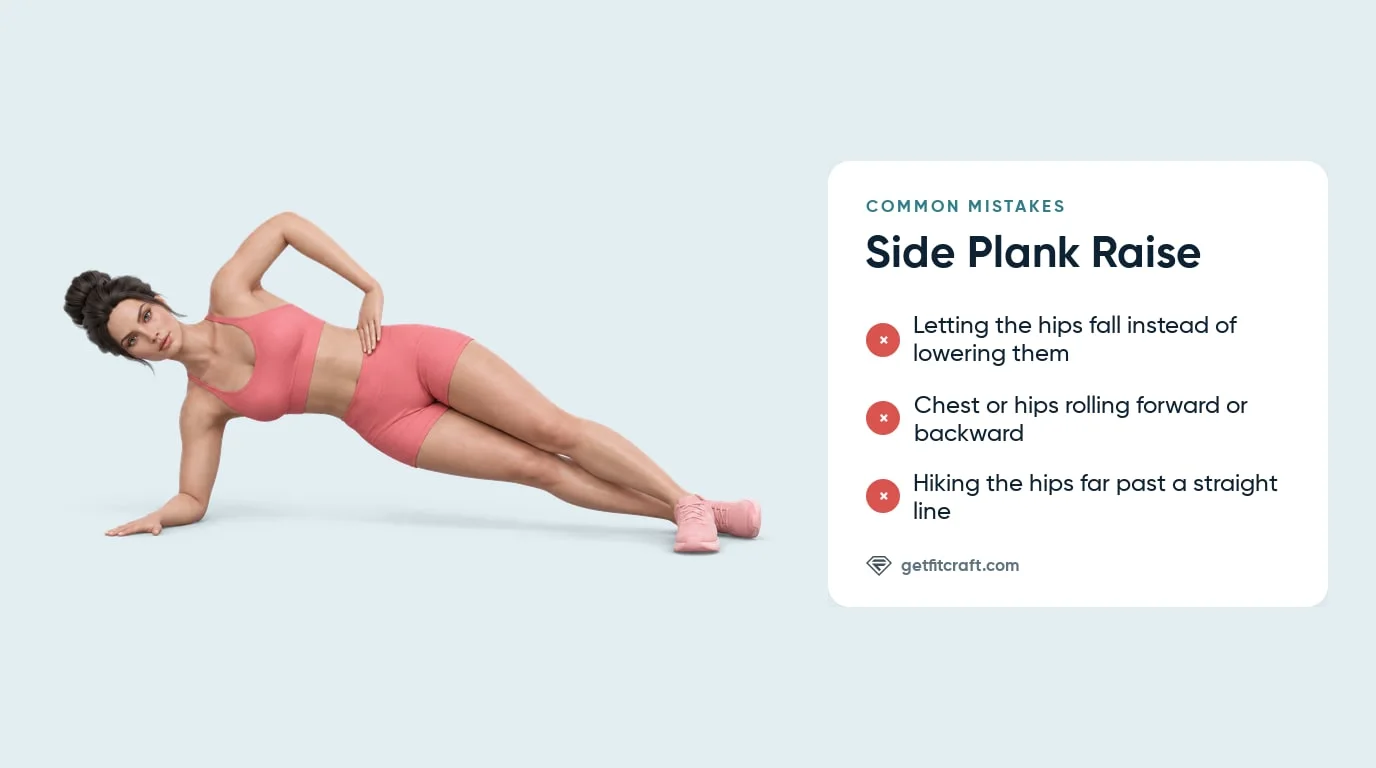
- Dropping too fast on the descent. Gravity does the work if you let your hips fall. Fix it by taking about a second to lower, then lifting with the same line each rep.
- Hiking the hips too high. The top of the rep is one straight line from head to heels. A touch higher is fine, but a big hike bends your body the other way. Fix it by stopping at the straight line.
- Rolling the torso forward or backward. Rotation shifts the work away from the lateral core. Fix it by keeping your chest open and imagining your back against a wall.
- Letting the elbow drift. If your elbow slides forward or behind your shoulder, the support arm takes unnecessary stress. Reset with your elbow directly under the point of your shoulder.
- Holding your breath. Fix it by breathing out as you lift the hips and in as you lower them. Never hold your breath.
- Shrugging the supporting shoulder. If your shoulder creeps toward your ear, press the floor away so the shoulder stays down.
- Chasing reps after form breaks. When you can't lift your hips back to a straight line, or your shoulder shrugs or your chest rolls, the set is done. Stop there and build the volume slowly.
Side Plank Raise Variations
Use the version that lets you keep the ribs and pelvis stacked. Progress only when every rep looks the same.
Knee-Supported Side Plank Raise (Easier)
Bend your knees and support yourself from your bottom knee and forearm. Perform the same hip dip and lift. This shortens the lever arm and makes the exercise easier to control.
Side Plank (Easier)
Hold the top position without dipping the hips. If you can't yet hold a standard side plank for 20 to 30 seconds per side, build that base before adding the raise.
Paused or Top-Leg-Lifted Side Plank Raise (Harder)
Pause for a second at the top of each rep and lower more slowly. For a bigger challenge, lift your top leg a few inches and keep it up through the set, with your hips still moving straight down and up.
Side Plank Reach Through (Harder)
This progression adds thoracic rotation while the hips stay lifted. Use it after the standard raise feels controlled on both sides.
When to Avoid or Modify Side Plank Raises
Side plank raises are safe for most healthy adults, but they put your bodyweight on one shoulder and move your hips under load, so a handful of conditions call for a doctor's or physical therapist's advice first. During any set, a burn along the side of your waist is normal, but any pain in a joint, your lower back, or your neck means stop. Always consult your physician or physical therapist for personalized guidance.
- Current shoulder pain or recent shoulder injury. The supporting shoulder carries your bodyweight on every rep. Skip side plank raises while your shoulder hurts, and see a doctor or physical therapist before you do them again. During any set, shoulder pain means stop.
- Acute lower-back pain or known disc pathology. Skip side plank raises while your back hurts. See a doctor or physical therapist before you do them again, and ask them which exercises suit you. During any set, lower-back pain means stop.
- Recent childbirth or active diastasis recti. Get clearance from your doctor or a women's health physical therapist before you do side plank raises, and follow the plan they give you.
- Recent abdominal surgery or hernia. Get clearance from your surgeon or physician before you do side plank raises, and ask them which exercises suit you.
- Pregnancy or pelvic-floor symptoms. Ask your doctor, midwife, or a pelvic-floor physical therapist before you do side plank raises. If you feel pressure, heaviness, or leaking, or see doming through the midline during a set, stop and tell them.
- Neck tension during the set. Keep your head in line with your spine, eyes looking straight ahead, instead of letting it hang. Any pain in your neck means stop.
Related Exercises
These exercises build the same lateral-core base or round out the full trunk stability pattern:
- Same plane: Side Planks train anti-lateral-flexion without the hip dip, and Side Plank Reach Throughs add rotation on top of the side plank base.
- Foundation for bracing: Deadbugs and Bird-Dogs teach you to keep your trunk steady while your arms or legs move, without your bodyweight on one shoulder.
- Anti-extension partner: Forearm Planks build the straight-line plank position from the front side.
- Rotational core partner: Plank Twists train controlled trunk rotation once your static plank base is solid.
- Hip support: Glute Bridges strengthen the posterior hip muscles that help keep the pelvis level.
How to Program Side Plank Raises
Side plank raises are a dynamic core exercise, so program them like controlled accessory strength work. The American College of Sports Medicine position stand on resistance training supports progressive overload through appropriate volume, rest, and frequency across training levels (Ratamess et al., 2009). It gives no set and rep ranges for the side plank raise itself, so treat the table below as a practical starting point.
| Version | Sets × Reps | Rest between sets | Frequency |
|---|---|---|---|
| Easier: from the bottom knee | 2-3 × 8-12 per side | 45-60 seconds | 2-4 sessions/week |
| Standard (Advanced in the app): from the feet | 3 × 10-20 per side | 45-60 seconds | 3-5 sessions/week |
| Harder: a pause at the top, or the top leg lifted | 3-4 × 15-30 per side | 60 seconds | 4-6 sessions/week |
Where in your workout: place side plank raises near the end of a strength session, in a core finisher, or in a short standalone core block. Avoid fatiguing your lateral core before heavy squats, deadlifts, carries, or overhead pressing.
Form floor over rep targets: the set ends when you can't lift your hips back to a straight line, your shoulder shrugs, or your torso rolls. Clean reps matter more than reaching a number.
How FitCraft Programs This Exercise
FitCraft maps your level, goals, and equipment during the free assessment and builds a plan around them. The app has a side plank raise exercise for each side, rated Advanced, and can include it in your plan.
Its 3D demonstration shows the move: a forearm side plank with the top hand on the hip, the hips lowering toward the floor and lifting back to a straight line.
Frequently Asked Questions
What muscles do side plank raises work?
Side plank raises mainly work the obliques, the muscles along the sides of your waist, which lower your hips with control and lift them back up. The glute medius on the side of your bottom hip and the transverse abdominis, your deep core, help. The posterior deltoids, rhomboids, and middle trapezius hold your shoulders back and your chest open, so your trunk does not roll forward as your hips move.
How many side plank raises should I do?
Start with 2 to 3 sets of 8 to 12 controlled reps per side, from your bottom knee if the full version is too hard. With the standard version, rated Advanced in the FitCraft app, use 3 sets of 10 to 20 reps per side, and with the harder versions use 3 to 4 sets of 15 to 30 slow reps. End the set when you can't lift your hips back to a straight line or your shoulder position changes.
What is the difference between a side plank and a side plank raise?
A side plank is an isometric hold. A side plank raise keeps the same lateral-core position but adds a controlled hip dip and lift. The raise gives your obliques and gluteus medius a dynamic shortening and lengthening demand instead of only a static brace.
Can beginners do side plank raises?
Yes, with an easier version first. The FitCraft app rates side plank raises Advanced, so most beginners should start with the same hip lifts from the bottom knee and forearm, or with a still side plank. Build toward a 20 to 30 second side plank per side without hip sagging before you make every rep dynamic.
Can I do side plank raises with shoulder pain?
Not while your shoulder hurts. The supporting shoulder carries your bodyweight on every rep, and any shoulder pain during a set means stop. If your shoulder hurts, feels unstable, or was recently injured, see a doctor or physical therapist before you do side plank raises, and ask them which exercises suit you.